November 30, 2010

Oh Christmas Tree (Part II)

This tabletop tree is adorable and just perfect for the kitchen. If you have a collection of old teacups you don't use, or if you're willing to purchase a few new ones, you can recreate this look by affixing the teacup to the saucer with liquid nails, and then tie a ribbon through the handle to hang it on the tree. Finish it off with a few wrapped tea bags just like you see above.

I love Christmas red and green, but this tree makes me smile. Who says you can't decorate with crayon box colors?

Totally glamorous, this tree is perfect for the decorating enthusiast. I just love the chandelier tree topper.

Tree decorations don't have to be expensive either. Just look outside for inspiration and you'll have so much to choose from. This tree is wrapped in grapevine and coxcomb covered styrofoam balls. Add a few berry branches, some pine cones, and a little sparkle and you're done.

If a tree is just too overwhelming to put together, then dress up a mantle or chest with pine branches, and fill decorative containers with ornaments as I've done here in my studio.

Images scanned from Victoria and Country Living magazines

November 29, 2010

Oh Christmas Tree (Part I)

My trees are up and (almost) decorated... but I still have a little more to do. As we selected our fresh tree over the weekend, I was reminded of just how many trees I have decorated - for myself and for clients - so I thought I'd share some photos I've collected over the years and walk you through my process.

I don't care for tree skirts, I prefer containers or additional greenery. I have "planted" trees in baskets, boxes, urns, and various pots. However, most of the tree stands in my home are covered with wreaths that I've simply split open and placed around the stand itself. Once you've gotten your tree up, here's what you do...
  1. Start wrapping the lights around your tree starting at the top. If your tree sits in a corner, you can simply swag the lights back towards the front once you've reached the wall. I don't go over the top because I prefer the decorations to take center stage. I use approximately 400 lights for a 8' tree. As you wrap, stand back occasionally and squint. You'll be able to tell if you're distributing the lights evenly using this very (technical ;o) method.
  2. If you're working with garland, this gets placed next. Use the same method as above, but be sure to swag the garland in either the opposite direction or just below or above the light strands.
  3. I place my tree topper before I decorate the rest of the tree so I don't knock anything off afterwards.
  4. Unwrap all of your ornaments and hang the largest, prettiest goodies at eye level and right in front. If you have several identical ornaments, place one towards the top, bottom, and on either side for better balance. Do this for all of your collections. Now place smaller ornaments at the top and work your way down to larger ornaments at the bottom. Create depth by placing large balls on the inside limbs for added sparkle and shine.
  5. Nestle unique items in among the branches. I have several pieces of sheet music I place in open nooks and crannies as a surprise.
  6. Finally, I place crystal icicles on the very tips of the branches as my finishing touch.
I love this tabletop tree. You can use lots of household items you may already have on hand as ornaments and hang them with pretty bits of ribbon.

We strung miles and miles of popcorn and cranberries on our tree when I was a child. Because our family ornaments were a mix of handmade and store bought, I decided that my children should have a tree of their own so they could have fun creating their very own designs. I have been buying each of them their own ornaments since they day they were born. Now family and friends join in on the fun. (They make great presents!) Here is a wonderful and simple children's tree you can recreate with paper or felt.

This photo was the inspiration for the tree in my daughters' room. The Nutcracker came to life with wooden character ornaments, yards of candy dot garland, and gumdrop branches. Gather twisted branches from your yard and place one gumdrop on each end, then simply stick the branches in among the boughs.

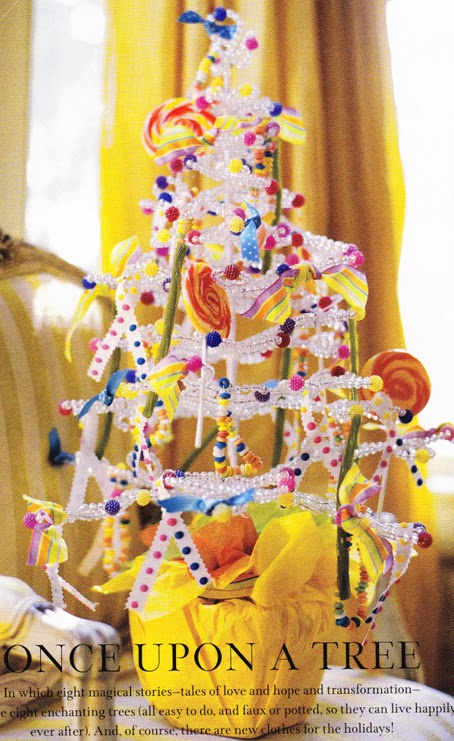
Here's another great idea. Who says trees need to have branches at all? Now use lots of candy - lollipops, candy necklaces, candy canes, shoelace licorice... whatever you can come up with!

Images scanned from BHG, Country Living, and Victoria magazines

November 18, 2010

Taking a Drive

I don’t know exactly when it started, but lately we’ve been taking a short drive to the local store just to “pick something up”. At first, it was because I needed milk, or bread, or some other must-have food item that needed to be purchased before dawn, then it became more of a nightly ritual. Coats on, hands stuffed in gloves, we’d stomp out to the still warm car David just returned home in to grab 20 minutes of quiet, adult time.

The peaceful drive through the woods, with just the sounds of our tires rolling over crushed stone and dirt roads, made the mundane chore of shopping seem like an adventure. During these twilight hours, we would spot deer running home for their supper while we watched the moon rise higher and higher in the sky. We’d tell silly jokes to break up the routine of recounting our day, and we’d hold hands like teenagers on their first date. 

When I was a child, my parents would shuffle my sister and me into the car and we'd all go for a long ride to nowhere. There was never any real destination that I knew of, just an opportunity to find someplace new. Sometimes we drove so far we'd end up in a different state (which come to think of it isn’t so hard to do in New England). At Christmastime, we would tour the neighborhoods just to look at the lights and marvel in their magic.

As we left the house last Saturday before the sun was up, I was reminded of how many times we would begin one New England vacation after another while the birds were still fast asleep. By breakfast time we had arrived at our destination. There's just something about taking a drive at night, all snuggled in your PJ's with a thermos of hot chocolate by your side that creates a sense of wonder and peace.

Soon, we will take our children out to the car, bundled in their own pajamas and with their own thermos of hot chocolate, to watch the snowflakes fly and embrace the beauty of winter. But we’ll still keep the drive to the store to ourselves.

Photo: wallpaperweb.org

November 16, 2010

Color: Cracks & Crevices

This tree trunk is a study in color. Here are some colors to inspire you...


Row 1: BM Bear Creek 1470, RL Blue Green GH81, BM Graytint 1611,
Magnetic Gray SW 7058, BM November Rain 2142-60

Row 2: Pratt & Lambert Autum Dusk 12-19, F&B London Stone 6, BM Middlebury Brown HC-68, F&B Buff 20, BM Brown Horse 2108-30

November 9, 2010

Change of Mood

Moody, rich hues have us grabbing that fur blanket, tossing another pillow onto a bed or sofa, and mixing an array of textures together. Go ahead - pile it on. Tis' the season to create a room that's warm and magical.


Images scanned from Country Home and Traditional Home magazines

November 4, 2010

Hooked On Houses

Have I told you my story about how I got hooked on houses? Well, it all began with this house. My father built it for my sister and me, and we loved to play in it all day long. We had a metal refrigerator and stove along the back wall, and a table and chairs right next to the window. Mom even painted the white daisy on the front door. Eventually a white picket fence and mailbox were added to complete the scene.

You see, I grew up around things being built and moved here and there throughout my childhood. My parents bought a dirt-floor cottage on a private road filled with other similar looking cottages; most of them were used as vacation homes in the area. The houses were set back near a pond and away from the main roads of town and for a long time, we were the only year-round residents.

Before they moved in, they completely rebuilt the ranch-style building by digging a foundation and replacing and securing walls and floors. Then a barn was built (no animals, just another building – this time for my dad), and then it was moved to another area on the property. The house was eventually expanded to include an upstairs and then a porch, which ended up being converted into yet another room. (Even an ordinary deck turned into a 3-level maze of a structure, but by then I had moved on and into my own home.) Although my father was not a builder by trade, he was/is a very handy guy (which was a good thing for my mother because she liked to change rooms around almost as often as she changed her mind!). My mother had the vision; my dad had the tools.

Weekends were spent moving furniture around just to see what it would look like over there – and then there – and then over there. Whole rooms would be moved just to “try it out”. My mother also adored furnishings and objects with patina and age, so we would frequent local antique stores, and shopped for more antiques anytime we would travel. I’m not sure if she knew exactly where something in particular might go, but I do know that she always found a place for it.

She had a knack for interior design and I learned firsthand at the hem of her skirt. When she wanted distressed floors, she simply walked out to the barn to find a hammer and some chains and went at it. (Knowing what I know now, I think banging up that floor probably relieved a lot of stress too.) She had an old wood-burning kitchen stove converted to gas simply because a new one wouldn’t do. When she wanted to display vintage household gadgets, she asked my dad to get her a large pegboard and then she covered it in burlap and s-hooks, and stuck it on the dining room wall. So you see, I get my love of design and decoration honestly; it runs in my blood as sure as salt water and cranberry bogs do.

I don’t know if my sister and I requested our own little house, or if my mother thought it was a good idea to cultivate our own love of keeping house, all I do know is that inside that little 6’x6’ cottage (and in the big one too), I learned to dream. I learned to create the same comforting, safe, and loving home I grew up in for my friends – imaginary and real. Then I took those lessons with me and set forth to recreate that warm and inviting home for my own family (and the families of others).

My love affair with houses was just getting started.

November 2, 2010

Vintage: Bringing Back the Guestbook

Whether you implement this idea just for the holidays or all year round, a guestbook makes a wonderful keepsake for you and your family.

When my husband and I got married, I wasn't interested in using just any old guestbook to collect signatures of our guests, I wanted something a little more personal. I ended up purchasing a beautiful blank journal and asked everyone to write anything they wanted - a note, a doodle, a poem - whatever they felt like sharing. You can do the same. Simply ask your guests to write down their thoughts about the visit, your home, the area, or you! Start a new tradition and set out your guestbook during the holidays or any special gathering.